
Of course when learning about weather it is important to learn about thermometers and temperature.
Here is an easy, fun activity that uses a recycled water bottle to make a homemade (or school made) thermometer!

Materials
Directions
As the temperature gets warmer, the liquid will expand (take up more space) and move up through the straw.
As the temperature gets colder, the liquid will contract and take up less space.
Caution: Do not place this homemade thermometer in a very cold place or very hot place. It is not designed for extreme temperatures.
Have fun learning about weather!

Here is an easy, fun activity that uses a recycled water bottle to make a homemade (or school made) thermometer!
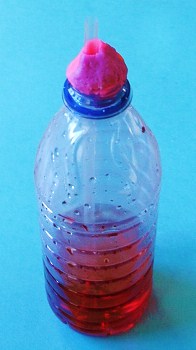
Materials
- recycled plastic water bottle
- water
- red food coloring
- rubbing alcohol
- clear plastic straw
Directions
- Fill approximately 1/4 of the bottle with an equal amount of water and the rubbing alcohol.
- Add food coloring.
- Place the straw in the bottle. Do not let it touch the bottom of the bottle. Make sure to leave a little of the straw sticking out of the bottle.
- Use some clay to anchor and seal the straw at the top of the bottle. Make sure the straw is sealed well with the clay but do not squeeze the straw.
- Move the bottle to different locations and OBSERVE. Try putting the bottle in a sunny spot. Does the liquid rise in the straw when you place it in the sun?
- Rub your hands together to warm them up (with friction). Then put your hands around the bottle. Does the liquid rise in the straw?
As the temperature gets warmer, the liquid will expand (take up more space) and move up through the straw.
As the temperature gets colder, the liquid will contract and take up less space.
Caution: Do not place this homemade thermometer in a very cold place or very hot place. It is not designed for extreme temperatures.
Have fun learning about weather!


