Saturday, November 12, 2011

Wreath Craft made with Paper Hearts

Here is a real easy and inexpensive wreath for kids to make. Very few supplies are needed. This arts and crafts activity is made entirely of heart shapes!


Materials
  • red and green construction paper
  • heart shapes - 2 sizes
  • pencil
  • scissors
  • glue

Directions

  • Trace and cut approximately 15 green hearts and 2 red hearts. (Trace a cookie cutter or other heart shape or draw a heart shape freehand to use as a template.)


  • Form a circle with the green hearts to make the wreath.

  • Glue the 15 green hearts together.
  • Use the 2 red hearts to form a bow at the bottom of the wreath.


  • Glue the 2 red hearts onto the wreath.
  • Trace or draw approximately 5 smaller red hearts. Use these smaller hearts to decorate the wreath and add a 'knot' to the middle of the bow.


  • Glue the small red hearts on the wreath.
  • Voila you are finished!
       Enjoy your new wreath!

Thursday, November 10, 2011

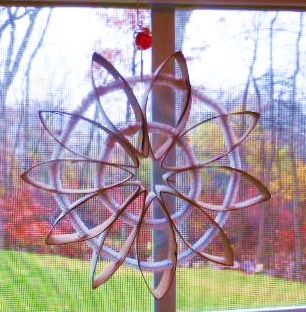
3D Snowflake Craft Activity

This Snowflake Craft Activity was found in Family Fun Magazine.


Materials
  • 1 paper towel roll or 2 toilet paper rolls (It's great to recycle!)
  • paint (optional)
  • ruler
  • pencil
  • scissors
  • paper punch
  • 3 chenille stems (pipe cleaners) white, silver, etc.

Directions
  • Paint the paper towel roll, if desired (white or other color).
  • Allow time for the paint to dry.
  • Cut the paper towel roll into sections approx. 3/4 inch wide. You will need about 10 sections.
  • Use the punch and punch 2 holes in each section. Each hole should be approx. 3/4 inch from the ends.
  • Thread all of your sections through a chenille stem. Curve the stem into a circle and twist the ends together.
  • Space the towel roll sections evenly on the chenille stem. This is the center of the snowflake.
  • Combine 2 chenille stems and repeat the process of threading it through the holes in the outer areas of the paper towel roll sections. Twist the ends of the stems together to make your second (but larger) circle.
  • Use an ornament hanger or string to hang your 3D snowflake on a tree, from the ceiling, in a window sill, etc.


    Curriculum Connections

    Math: This Snowflake Craft can be made when teaching a unit on 3D shapes or rotational symmetry in Geometry.
    Science: This craft can also be used when teaching about Weather and/or Precipitation. 
    (4 types of precipitation: rain, snow, sleet, hail)
    Language Arts: There are also numerous, excellent, fiction and non-fiction books that students can read that have a snow theme.
    (One of my all time favorites: Robert Frost's poem, Stopping by Woods..., illustrated by Susan Jeffers)


    Tuesday, November 8, 2011

    Geometry - Making a Paper Plate Icosahedron

    An Icosahedron is a 3D Shape with 20 Sides!


    Materials
    • 20 small plates
    • stapler
    • crayons/markers (optional)

    Directions
    • Students could color or decorate the plates, if desired.


    • Next, fold each plate into a triangle.


    • Staple 2 plates together. Use 3 staples.
    • Attach 3 more plates and form a pentagon.

    • Repeat the last 2 steps with 5 more plates to make another pentagon.
    • Staple the 10 remaining plates together into a long chain.

    • Staple the ends of the chain together to form a circle.

    • Staple one pentagon to the top of the circle and the other pentagon to the bottom of the circle.


     You can now display your 3D figure on a table or hang it from the ceiling.


    Math Facts

    An icosahedron has:
    • 20 triangular faces (sides)
    • 12 vertices (corners) 
    • 30 edges

    Have fun with geometry!


    Monday, November 7, 2011

    Making a Sun Clock

    How did people tell time before our analog and digital clocks were invented?

    They used the SUN! 


    In this Science and Math Activity, we will make a Sun Clock.

    Materials
    • cardboard or heavy paper
    • pencil and marker
    • protractor
    • clay
    • watch 
    • compass

    Directions
    • Place the protractor on the cardboard.
    • Draw around the outside of the protractor.
    • Mark the following angles: 0 degrees, 30 degrees, 60 degrees, 90 degrees, 120 degrees, 150 degrees, 180 degrees.


      • Turn the protractor around and again draw the outside of the circle (to complete the circle). 
      • Then mark the same angles.


        • Write the clock numbers (1-12) on the circle as they appear on a clock.


          • Place a small wad of clay in the middle of the clock and place the pencil in the clay so that the pencil stands straight up.


          • On a sunny day, take the clock outside and use a compass to locate NORTH.
          • Place the clock on the ground in the Sun. Have the number 12 facing North.
          • Observe the shadow made by the pencil.
          • "Does the shadow made by the pencil on the clock tell you the time?"


          • Check the time with your watch.
          • "Compare the time on the shadow clock with the time on your watch.
          • Does your shadow clock tell the right time? {No}"
          Explanation:

          "This is because the Sun does not move in a circle around the sky. Instead, it moves in an arc from east to west across the southern sky.

          Shadows fall within the arc formed between East-North-West. Shadows are shortest at noon and longest at sunrise and sunset."

          
          diagram by Janice VanCleave


          • Have students continue to observe the movement of the shadow over time. 


          Photo Diagram by Janice VanCleave

            Sun Clock / Sundial
              Further Explanation

              During the day, it will appear that the position of the Sun is changing but really it is the Earth moving as it rotates on its axis.

              (The time will be off by one hour during daylight savings time.)


              DEAR Reader,
              This post has been edited. My original explanation had some errors. I was contacted by the incredible Janice VanCleave. She kindly explained how to fix my errors and included some wonderful diagrams that I could share with you. I apologize for my previous errors and thank Janice for reading my post, contacting me, and helping me correct the information.

              Janice is awesome! She is the author of 50 best selling science experiment books for kids! :) You can visit Janice's blog at http://scienceprojectideasforkids.com/.  I just visited and signed up for her newsletter! :)

              Enjoy your new clock!


              Sunday, November 6, 2011

              Making a Tornado using Recycled Bottles

              Making a Tornado Model is lots of fun for kids!They will want to repeat making a vortex again and again!!!


              Materials
              • 2 clean, clear, recycled 2-liter bottles (remove labels)
              • water
              • tornado tube connector (approx. cost $3.00) 
              • food coloring (optional) 
              • funnel (if available)


              Directions
              • Recycle two 2-liter bottles. Remove labels.
              • Have an adult remove any plastic rings that are on the necks of the bottles.
              • Add water to one bottle (approx. 2/3 full).
              • Add a couple of drops of food coloring.
              • Screw on the tornado tube connector to the bottle with water.
              • Screw the other bottle onto the other end of the tube.
              • Flip the bottles over quickly and carefully.
              • Hold the bottles tightly and swirl it around several times in a circular motion.
              • Observe the vortex action!

              This activity works great with a Science Unit on Storms and/or Weather and when learning safety procedures during storms.

              You can use duct tape instead of the tornado tube connector but it doesn't work as well!  : (    (I tried!)

              I purchased the tornado tube connectors at a local Lakeshore Learning Store but they are also available at Amazon.


                Have fun!


              ___________________________________________________________

              Friday, November 4, 2011

              3D Turkey TP Roll Craft


              Here is a fun 3D paper TURKEY for kids to make.


              This Craft could be used with a Thanksgiving theme (social studies) or Animal theme (science - birds or vertebrates). It could also be used in Math with a Geometry theme of 2 and 3 Dimensional Objects. The kids could also draw or color a 2D turkey and compare the 2D and 3D figures.


              Materials
              • toilet paper roll (I love crafts that recycle!)
              • white paper and crayons/paint or colored paper (for the fan)
              • scissors
              • glue
              • crayons
              • printer to download and print the turkey template and instructions from DLTK
              • paper for printer
              Click on the link below for the template and instructions from DLTK.

                 http://www.dltk-holidays.com/thanksgiving/mtpturkey.htm

              My only real change from DLTK 's directions was using colored construction paper for the fan instead of white paper.


              These 3D turkeys would look great and be very useful as real napkin holders on the Thanksgiving table!


                 Have fun crafting!


              _______________________________________________________


              Wednesday, November 2, 2011

              Creating Paper Cut-Outs


              Here it is a new month! This month my posts will mostly be Arts and Crafts. I will note when a craft overlaps with math, science, reading, social studies, etc. I think kids learn best when they are having fun and hands-on crafts are a good way to get kids interested in lots of different subjects.

              Today's CRAFT ACTIVITY can also be used as a Math (Geometry) Activity for SYMMETRY.

              Creating Paper Cut-Outs

              Materials
              • Paper
              • Pencil
              • Scissors
              • Markers, crayons, etc. (optional)

                Directions
                • Take a sheet of paper and fold over one end (approx. 1 inch or more).
                • Turn the paper over and again fold over the same end.
                • Repeat the above step again and again until all the paper is folded.
                • The sheet of paper should now look like a fan.
                • Draw one side of a tree or other figure on the top fold. Make sure part of the drawing comes all the way to the edge of the paper.
                • Cut out the figure with scissors. (Do not cut the folded end.)
                • Open the paper.
                • Enjoy your symmetrical cut-outs.
                • Color the figures, if desired.
                • Observe how the folds are now lines of symmetry


                  Here are some other ideas!


                  Wishing you a great month!


                  LinkWithin

                  Related Posts Plugin for WordPress, Blogger...

                  LinkWithin

                  Related Posts Plugin for WordPress, Blogger...